Hacked! Lessons from a Compromised Server
My VPS got hacked! Discover the lessons I learned about server security, SSH hardening, firewalls, Docker networking, and reducing the attack surface.

احييكم بتحية الإسلام السلام عليكم ورحمة الله تعالى وبركاته
The Story
Hi everyone! It’s me again, and this time I want to share a real story about how my server got hacked and what I learned from the experience.
It all started while I was working on a freelance project. I had rented an unmanaged Linux VPS from Contabo, which meant I was fully responsible for managing, configuring, and securing the server.
Everything was going fine. My application was running smoothly, and I didn’t notice anything unusual. Until one day, June 10, 2026, when I received an unexpected email from Contabo’s Trust & Compliance team. My VPS had been reported for launching SSH/FTP brute-force attacks against external servers!
I was shocked. I had deployed a backend application, but somehow my server was being used to generate malicious traffic, potentially as part of automated attacks against other machines.
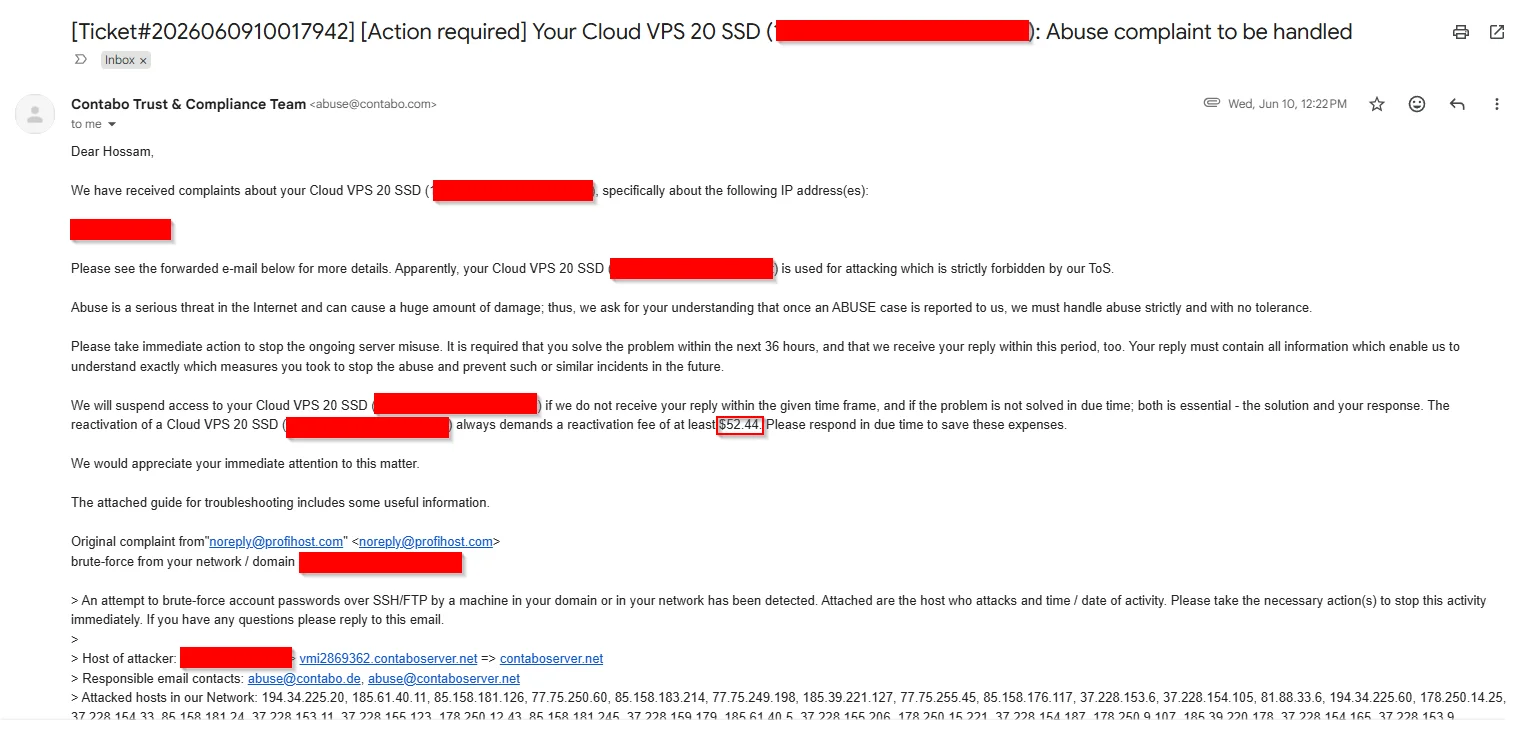
I thought I had a problem to investigate, but things didn’t end there. Just 12 days later, on June 22, I received another abuse complaint! This time, my VPS was reported for making unauthorized access attempts against an external mail server.
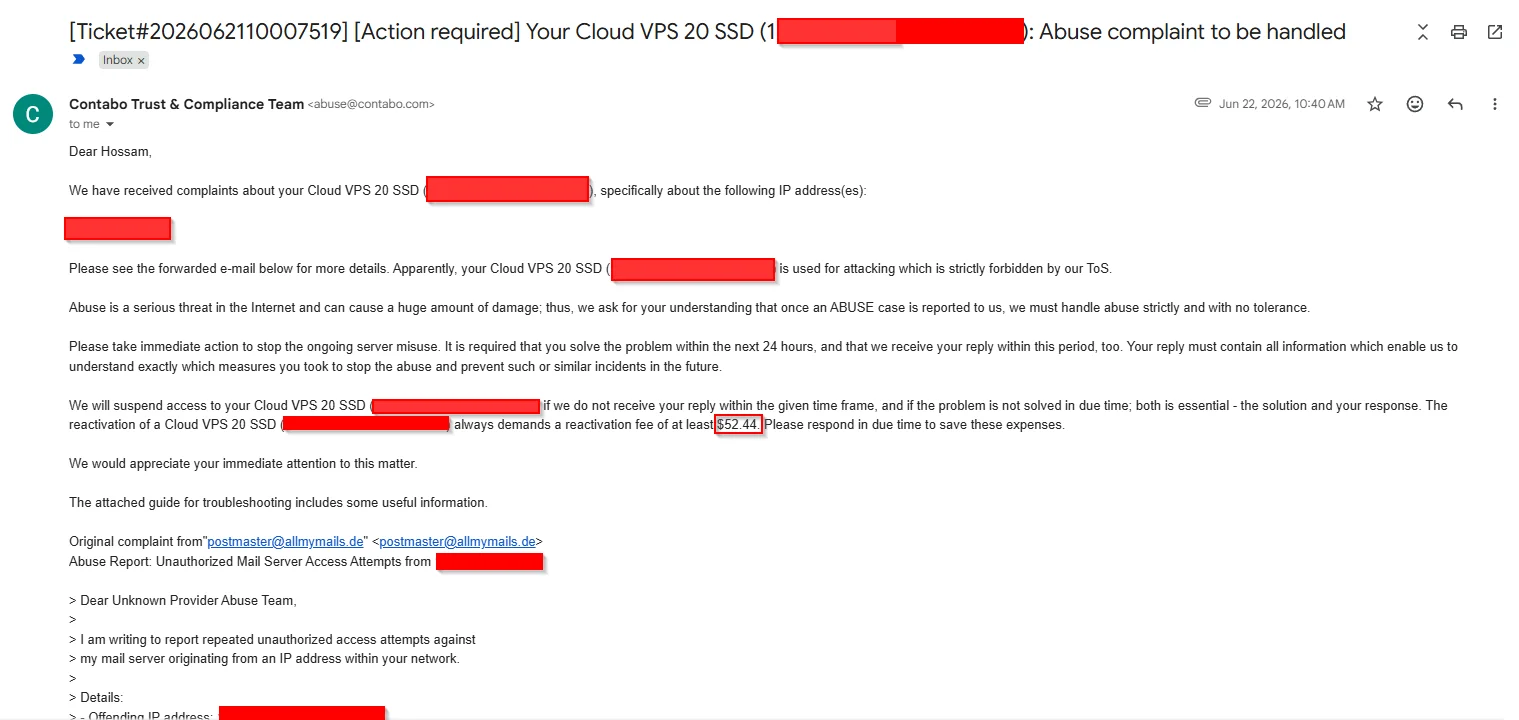
After investigating these incidents with the help of ChatGPT and some research, I realized how many important security practices I had missed. I also discovered a suspicious Docker container that was generating unauthorized traffic, confirming that my server had been compromised. And here’s the interesting part…
My backend application was running smoothly, validating inputs, enforcing roles and permissions, and doing everything I expected it to do.
But while I was focusing on application-level security, I had missed several critical aspects of server and infrastructure security. 😓
I decided to rebuild my server from scratch and take security much more seriously. So, in this post, I’ll share the server security checklist I put together as a software engineer, based on the mistakes I made, the issues I discovered, and the lessons I learned along the way. Let’s get into it!
Handling Steps
Here are the steps I followed to secure my server, reduce its attack surface, and prevent similar incidents in the future.
Install latest updates of the OS
You should install the latest updates for your server OS as it’s not aways the latest version. You may already know this, but consider it a friendly reminder not to forget what I forgot to do!
1
2
sudo apt update
sudo apt upgrade -y
apt update: Refreshes the list of available packages and updates.apt upgrade -y: Installs available package upgrades.
Don’t Use the Root User Directly
As you may already know, you shouldn’t use the root user directly to run your applications. Instead, you should create a separate user account for each application/service with the required permissions to read the files or configurations needed to run properly.
For example, the app user should be able to read JAR files to run a Spring Boot backend application.
Create a dedicated user for your application:
1
sudo useradd --system --no-create-home --shell /usr/sbin/nologin app
Then, you can run your application using this user:
1
sudo -u app java -jar /opt/app/application.jar
Make sure the app user has the required permissions to read the JAR file and configurations, and write to any directories the application needs.
This follows the Principle of Least Privilege, but keep in mind that creating a new user with sudo/root privileges doesn’t strictly enforce least privilege.
Securing SSH Access (Disable Root Login & Password Authentication)
Disable direct root access over SSH. Instead, create another user with sudo privileges and use it.
Create a new user for server administration:
1
2
sudo adduser deploy
sudo usermod -aG sudo deploy
This reduces the attack surface and prevents attackers from directly targeting the most privileged account through SSH.
The second part is to disable SSH password authentication and use SSH key-based authentication instead. Passwords can be leaked or brute-forced, so you should disable password authentication.
First, generate an SSH key on your local machine:
1
ssh-keygen -t ed25519 -a 100
Copy your public key to the server:
1
ssh-copy-id deploy@SERVER_IP
Then, test the SSH connection using your new user:
1
ssh deploy@SERVER_IP
Once you’ve confirmed that SSH key authentication works, create a security configuration file:
1
sudo nano /etc/ssh/sshd_config.d/01-security.conf
Add the following configurations:
1
2
3
4
PermitRootLogin no
PasswordAuthentication no
KbdInteractiveAuthentication no
PubkeyAuthentication yes
Validate and apply the configurations:
1
2
sudo sshd -t
sudo systemctl reload ssh
You can verify the effective SSH settings using:
1
sudo sshd -T | grep -Ei 'permitrootlogin|passwordauthentication|kbdinteractiveauthentication|pubkeyauthentication'
Make sure the effective settings match your intended configuration, including any settings from other SSH configuration files.
Important: Always make sure that SSH key authentication works with a non-root user before disabling password authentication or root login. Otherwise, you might not be able to log in to the server again and could lock yourself out of your own server.
Also, keep your current SSH session open while testing the new configuration in a separate terminal.
Firewall Configurations
Another important step is to enable a firewall to deny incoming connections by default and allow outgoing traffic based on your application’s requirements. For stricter environments, consider outbound filtering and explicitly allowing only necessary connections.
For example, my server needs ports 22 (SSH), 80 (HTTP), and 443 (HTTPS), so I allowed them using UFW (Uncomplicated Firewall).
First, configure the default policies:
1
2
sudo ufw default deny incoming
sudo ufw default allow outgoing
Then, allow the required ports:
1
2
3
sudo ufw allow 22/tcp     # SSH
sudo ufw allow 80/tcp     # HTTP
sudo ufw allow 443/tcp    # HTTPS
Finally, enable the firewall and verify the rules:
1
2
sudo ufw enable
sudo ufw status verbose
You can use any firewall that fits your needs. I chose UFW because it’s simple and easy to configure.
Now, maybe someone called Ahmed Mash’al would ask me: Why are we allowing all outgoing connections? Doesn’t that mean an attacker could use the server to launch DDoS attacks, for example?
Good question, my friend!
Yes, allowing all outgoing traffic means that if an attacker compromises the server, malicious processes could potentially use it to attack other machines.
However, the server needs outgoing connections for several purposes:
- Downloading updates for the OS, Docker, etc.
- Calling external APIs from the backend.
- Connecting to Docker Hub and GitHub.
- Sending emails or using third-party services.
Instead of blocking all outgoing traffic, you can start by blocking unnecessary connections.
For example, my server doesn’t need to initiate SSH connections to other servers, so I can block outgoing SSH traffic on port 22:
1
sudo ufw deny out 22/tcp
For stricter security, you can apply a default-deny outbound policy and explicitly allow only the connections your applications need.
Important: Docker manages its own networking and firewall rules, so UFW alone may not restrict traffic from Docker containers as expected. We’ll discuss Docker networking in the next sections.
Lesson learned: Securing a server isn’t just about controlling who can get in. It’s also about controlling what can go out.
Prevent SSH Brute-Force Attacks Using Fail2ban
Even after disabling root login and password authentication, you can add another layer of protection against repeated unauthorized access attempts using Fail2ban.
Fail2ban monitors authentication logs, detects suspicious patterns such as repeated failed login attempts, and temporarily blocks offending IP addresses using firewall rules based on your configuration.
You can install Fail2ban using:
1
sudo apt install fail2ban -y
Then, create a configuration file for SSH protection:
1
sudo nano /etc/fail2ban/jail.d/sshd.local
Add the following configuration:
1
2
3
4
5
6
7
8
[sshd]
enabled = true
port = 22
filter = sshd
backend = systemd
maxretry = 3
findtime = 10m
bantime = 24h
This configuration means:
- maxretry = 3: Ban an IP address after 3 matching failed authentication attempts within the configured time window.
- findtime = 10m: Track failed attempts within a 10-minute window.
- bantime = 24h: Ban the offending IP address for 24 hours.
- backend = systemd: Monitor SSH authentication events through the systemd journal.
After configuring Fail2ban, enable and restart the service:
1
2
sudo systemctl enable --now fail2ban
sudo systemctl restart fail2ban
You can verify that SSH protection is active and check the banned IP addresses using:
1
sudo fail2ban-client status sshd
Important: Fail2ban adds another layer of security, but it doesn’t replace SSH key authentication or protect against every type of attack. Also, make sure its firewall actions are working correctly.
You can learn more about Fail2ban configurations here.
Docker Misconfigurations: How I Exposed Redis
This was the most interesting and shocking part for me, and I learned some important lessons from it.
Let’s start with this section of my Docker Compose file:
1
2
3
4
5
6
7
8
9
10
11
redis:
  image: redis:8.10.2
  restart: always
  ports:
    - "6379:6379"
  command:
    - redis-server
    - --appendonly
    - "yes"
  volumes:
    - redis-data:/data
Can you spot the problem?
You might notice that the Redis container has no authentication configured. You’re absolutely right, but there’s something else I didn’t know at the time.
Using the port mapping 6379:6379 publishes port 6379 on all host network interfaces (0.0.0.0 by default), potentially exposing Redis to the public internet.
During the early stages of the project, one of my backend services was experiencing frequent, unexpected cache misses, even though the data was preloaded at application startup.
After investigating, I discovered that my Redis instance was publicly exposed without authentication. An attacker had gained unauthorized access and was repeatedly deleting cached data.
I had assumed Redis was only accessible to my application because it was running inside Docker.
A single Docker Compose line like 6379:6379 can expose an internal service to the internet, potentially allowing unauthorized access to application data. I learned this the hard way! 🥲
How Did I Fix It?
First, I restricted Redis port publishing to localhost:
1
2
ports:
  - "127.0.0.1:6379:6379"
I applied the same approach to the other internal services that needed local access and configured a dedicated internal Docker network for communication between containers.
This prevents the port from being published directly on the server’s public network interfaces.
However, services bound to localhost are no longer directly accessible from my local machine using tools like RedisInsight or DBeaver.
To access them securely, I use SSH port forwarding.
For example, to connect to Redis:
1
ssh -i ~/.ssh/YOUR_SSH_KEY -L 16379:127.0.0.1:6379 -N deploy@SERVER_IP
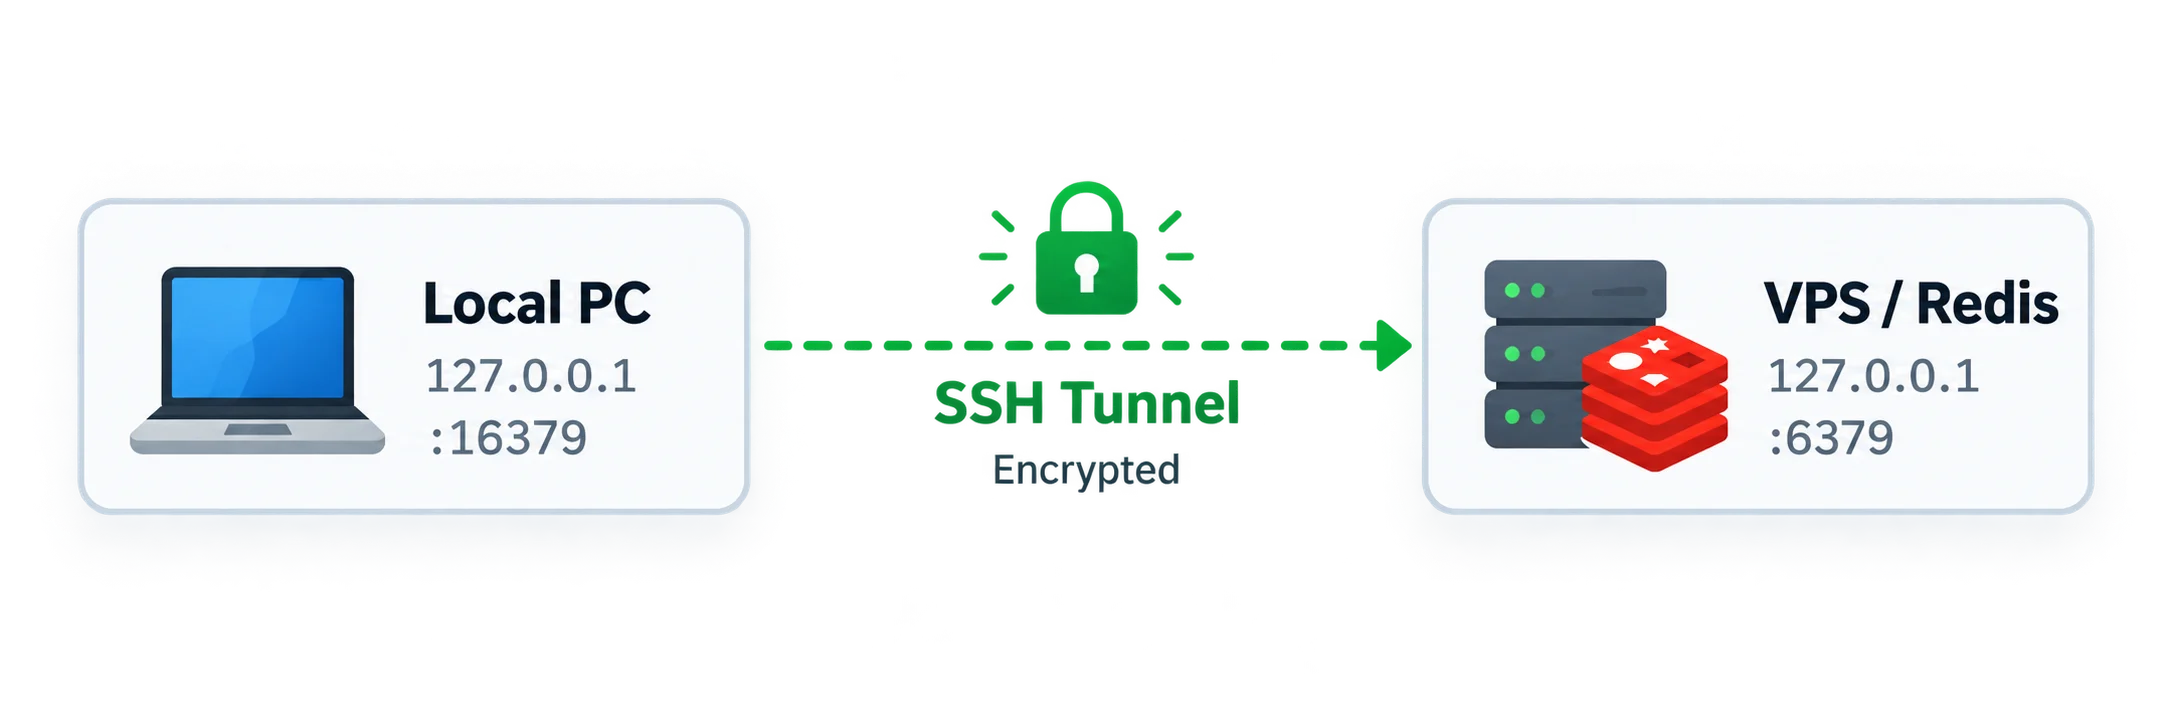
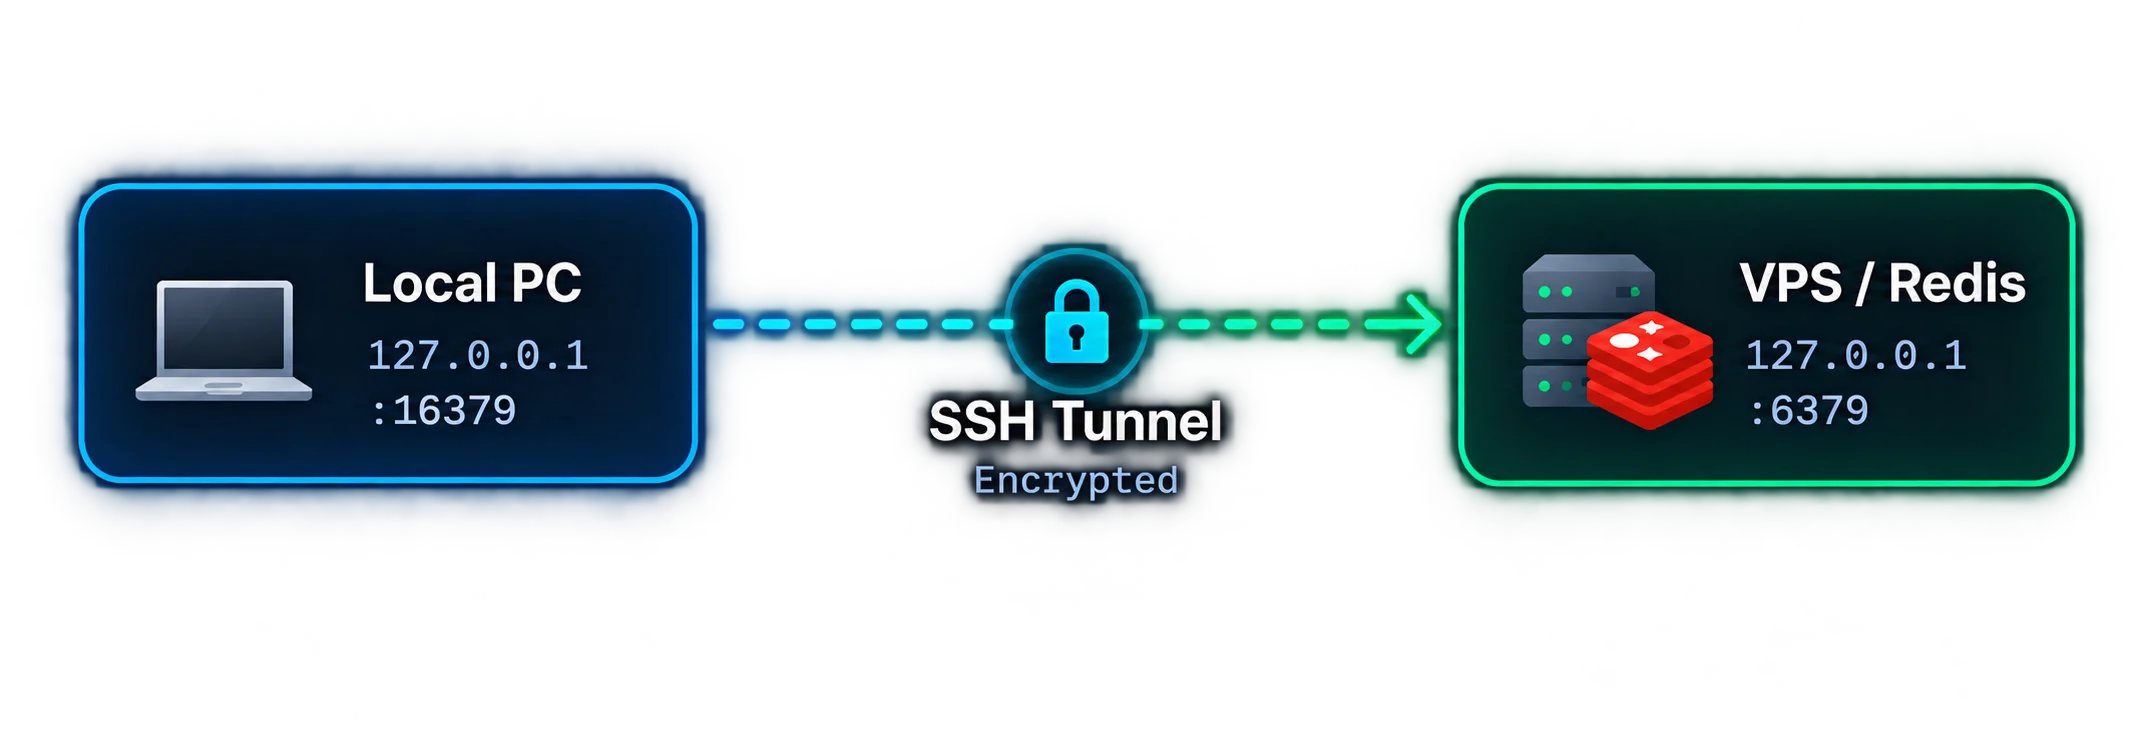
Once the SSH tunnel is established, I can connect using RedisInsight or the Redis CLI:
1
redis-cli -h 127.0.0.1 -p 16379
This allows me to manage Redis through an encrypted SSH connection without exposing its port directly to the internet.
NOTE: If your backend application also runs inside a Docker container, you don’t need to publish Redis ports at all when only the backend needs access to it.
For example:
1
2
3
4
5
6
7
8
9
10
11
12
13
14
15
services:
  backend:
    build: .
    depends_on:
      - redis
    environment:
      SPRING_DATA_REDIS_HOST: redis
      SPRING_DATA_REDIS_PORT: 6379
    ports:
      - "8080:8080"

  redis:
    image: redis:8.10.2
    restart: unless-stopped
    # No ports published
In this example, Docker Compose creates a private project network by default, allowing the backend to communicate with Redis using redis:6379 without publishing Redis’s port on the host.
Important: Restricting ports and using private Docker networks reduces exposure, but it doesn’t replace proper authentication. Redis ACLs or authentication should still be configured where appropriate.
Also, Docker manages its own firewall rules, so UFW alone may not protect published container ports. Make sure you’re using an updated Docker Engine.
Lesson learned: Just because a service runs inside Docker doesn’t mean it’s automatically isolated from the internet.
Conclusion
This experience taught me that server security isn’t just about deploying an application and making sure it works. It’s also about understanding what you’re exposing and how it could be exploited.
Following these security practices won’t make your server 100% secure, but it will reduce its attack surface, and make it harder for attackers to compromise your system.
I’m sharing this because I learned these lessons the hard way, and hopefully, someone else can learn from my experience before facing the same situation. If you’ve experienced something similar or have additional security practices you’d recommend, I’d love to hear them in the comments.
وشكرا 🩵