Mastering Multi-Tenancy Architecture in Spring Boot
Explore the concept of multi-tenant applications, their significance in modern software development, and step-by-step guidance to implement them using Spring Boot

احييكم بتحية الإسلام السلام عليكم ورحمة الله تعالى وبركاته
Introduction
Hi folks, Hossam here! In this article, I’ll take you on an exciting journey to dive deep into the multi-tenancy architecture, which is widely used in many modern applications that need to support multiple customers or organizations, each with their own data separated and secured.
Here, I’ll show you how to build a multi-tenant application using Spring Boot & Hibernate. Also, we will explore the different ways to separate tenants’ data and share some tips for making your app scalable.
Let’s start . . .
The Story
Have you ever wondered how platforms like Shopify, Zoho, and Salesforce, etc., serve thousands of customers seamlessly?
Let’s say you’re using Zoho Books to manage your company’s finances. Or you decide to build your online store on Shopify.
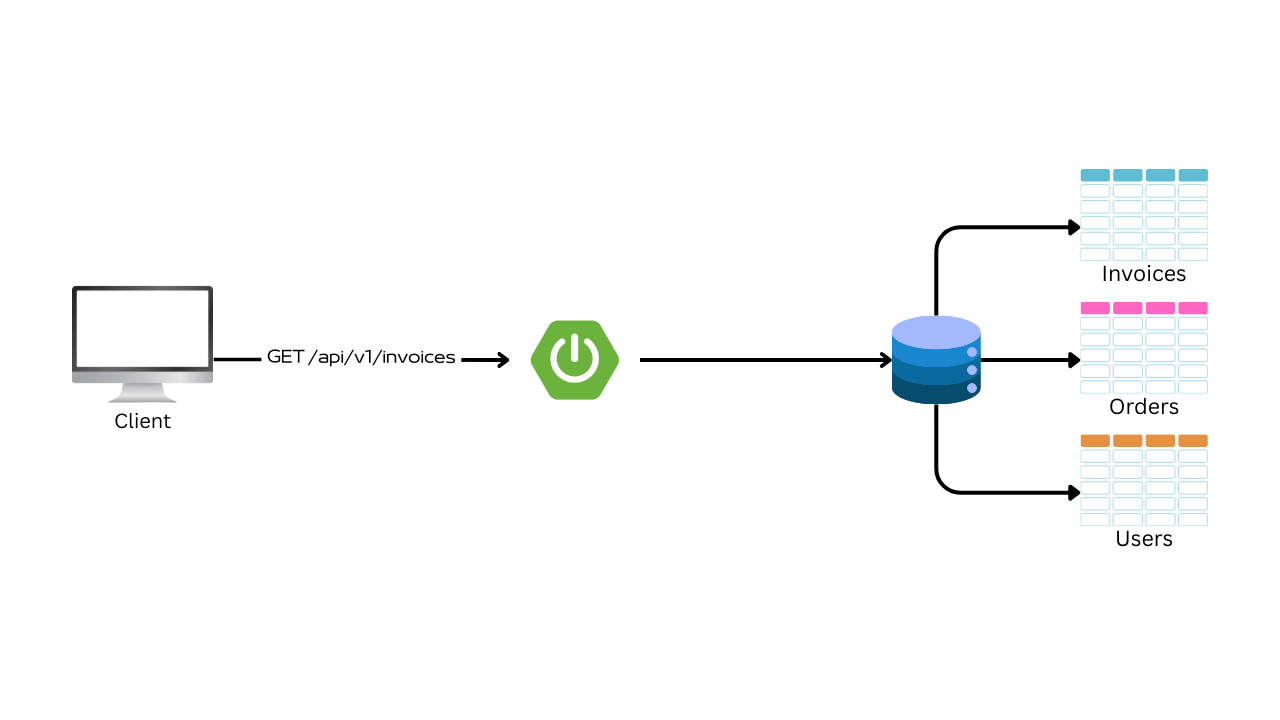
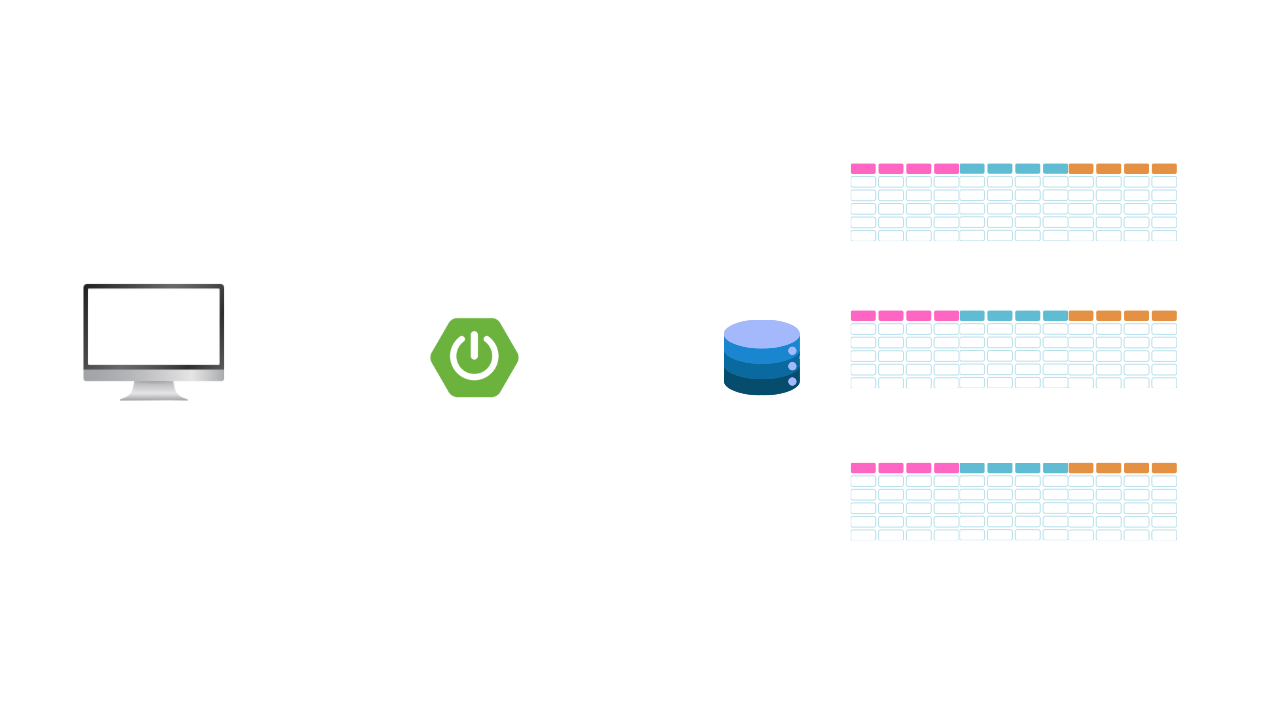
💭 Do you think Zoho or Shopify creates a new application instance and deploys it for every customer or shop for every new registration? Like the following image:

= The answer is No.
But why not give each customer their own instance?
It might sound good only in theory—one shop, one new app. But in reality, it’s a nightmare to develop and maintain. Let me show you why:
Imagine we are the Shopify platform, and we only have 5 shops. Now, we discover a bug or want to introduce a new feature to the platform. What are we going to do for this?
The answer is so simple—short steps at best:
- Take a backup of the shop database.
- Write code to fix the bug.
- Replace the old deployment with your new enhanced one for each shop application.
- Test each shop separately to ensure everything is okay.
Sounds easy and doable? Maybe — with 5 shops.
💭 But what if you have millions of shops? Would you repeat all of that millions of times?
Exactly — it doesn’t scale.
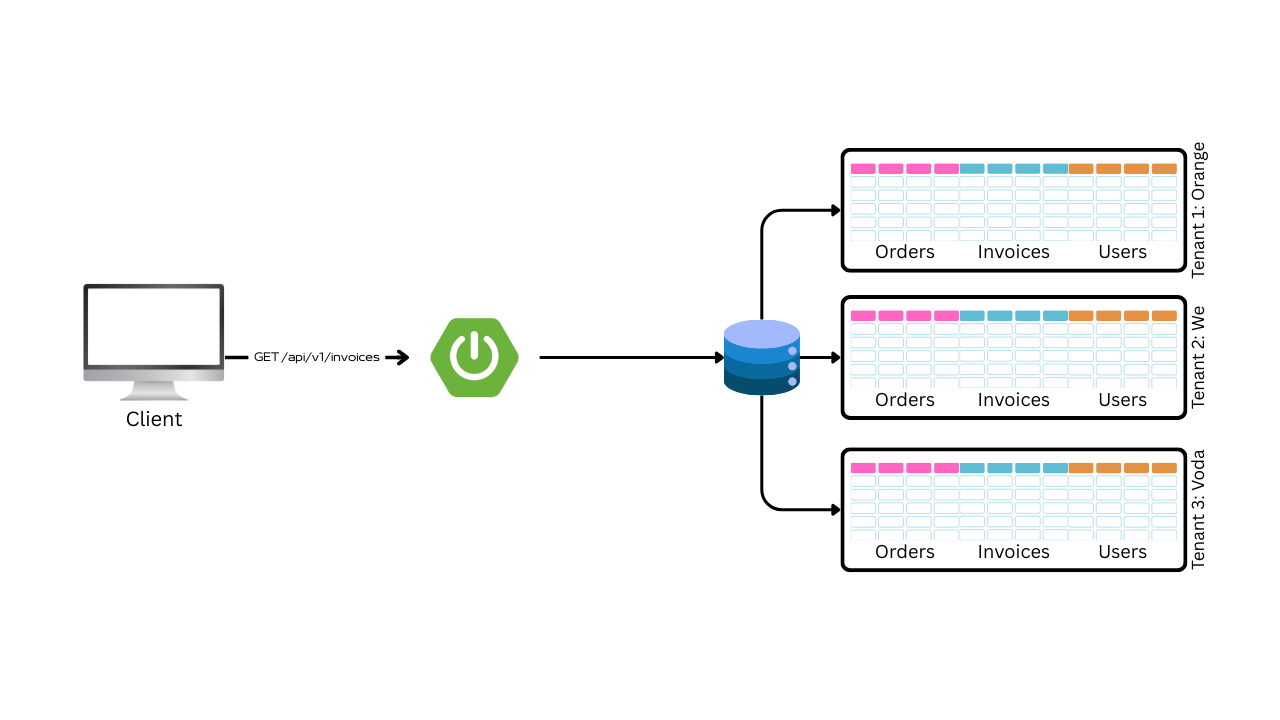
That’s where Multi-Tenancy comes in — and saves the day.
What is Multi-tenancy?
In simple terms, multi-tenancy is a software architecture pattern that allows a single instance of a software application to serve multiple customers (tenants).
In other words, multiple tenants share the same application and database while keeping their data isolated from each other.
Why Multi-tenancy?
There are several reasons why multi-tenancy is preferred in modern applications:
- Cost Efficiency: By sharing resources like servers and databases, you can reduce infrastructure costs significantly.
- Scalability: Adding new tenants becomes easier as you don’t need to set up new instances for each one.
- Simplified Maintenance: Bug fixes and feature updates can be rolled out to all tenants at once.
Data isolation techniques
Data isolation is the most critical aspect of multi-tenancy. Each tenant’s data must be secure and completely separate from others. Choosing the right technique depends on your application’s requirements and environment.
In this section, we’ll cover the most common data isolation techniques and how to choose the one that best fits your use case.
Here are the three most common approaches:
- Single Database (Shared Schema)
- Single Database (Separate Schemas per Tenant)
- Separate Database per Tenant
Single Database (Shared Schema)
In this approach, all tenants share the same tables (schema), and every table has the tenant_id to separate each tenant’s rows. For this reason, it is also called Row-Level Isolation.
Pros
Easy to maintain
Cost-effective
Easier to scale
Since all tenants use the same database and schema, it is easier and cheaper to manage. Shared resources like servers and RDBMS help reduce operational costs, and updates or fixes can be applied once and affect all tenants simultaneously.
Cons
Risk of data leakage if filtering isn’t done properly
Harder to tune performance per tenant
Because tenant data resides side by side in the same tables, filtering every query by tenant_id is critical. A single missed filter could expose data to the wrong tenant. Additionally, performance tuning becomes tricky, as all tenants share the same database resources.
When to Choose This Approach
Choose this approach when you want to:
Build an application where all tenants can use the same database structure and don’t need any special custom features per tenant.
Build an application where tenant traffic is expected to be normal, and no heavy data size is anticipated.
Scale your application horizontally with a simple database structure.
When to Avoid This Approach
Avoid this approach if:
Tenants require special features or custom database structures.
Tenants need strict data isolation at the database level due to security or privacy concerns.
Some tenants have high traffic and large data sizes (e.g., millions or billions of rows), which could negatively impact performance for other tenants.
These considerations are based on the relational model. Other databases like MongoDB (document-based) or Neo4j (graph-based) may have different benefits or be better suited for certain use cases where relational databases fall short.
Single Database – Separate Schemas per Tenant
In this approach, each tenant has its own schema (e.g., tenant1.users, tenant1.orders, tenant2.orders), but all tenants share the same physical database. For this reason, it is also called Schema-level isolation.
Pros
Better data isolation
Easier to perform backups and migrations for each tenant separately
Each tenant’s data is isolated at the schema level, reducing the risk of data leaks that could occur in the previous approach relying on filtering. This also allows you to manage each tenant’s data independently, making it easier to perform tasks like backups and migrations for each tenant without affecting others.
Cons
More complex schema management
Not suitable for a very large number of tenants
The complexity arises from managing a large number of schemas. As the number of tenants grows, you’ll face challenges in maintaining and updating schemas for each tenant, which can become cumbersome. Using automation and tools can help in this case 😊.
When to Choose This Approach
Choose this approach when:
Tenants require some level of customization, such as custom indexes or constraints.
You want to perform backups, restores, or migrations per tenant without affecting others.
Tenants need better data isolation than shared schema without the need for a separate database.
You expect a manageable number of tenants for which you can handle schema management.
When to Avoid This Approach
Avoid this approach if:
You expect a very large number of tenants due to the required schema management and performance maintenance.
Your application requires high-frequency operations across tenants, as it could lead to slowdowns in operations such as joins.
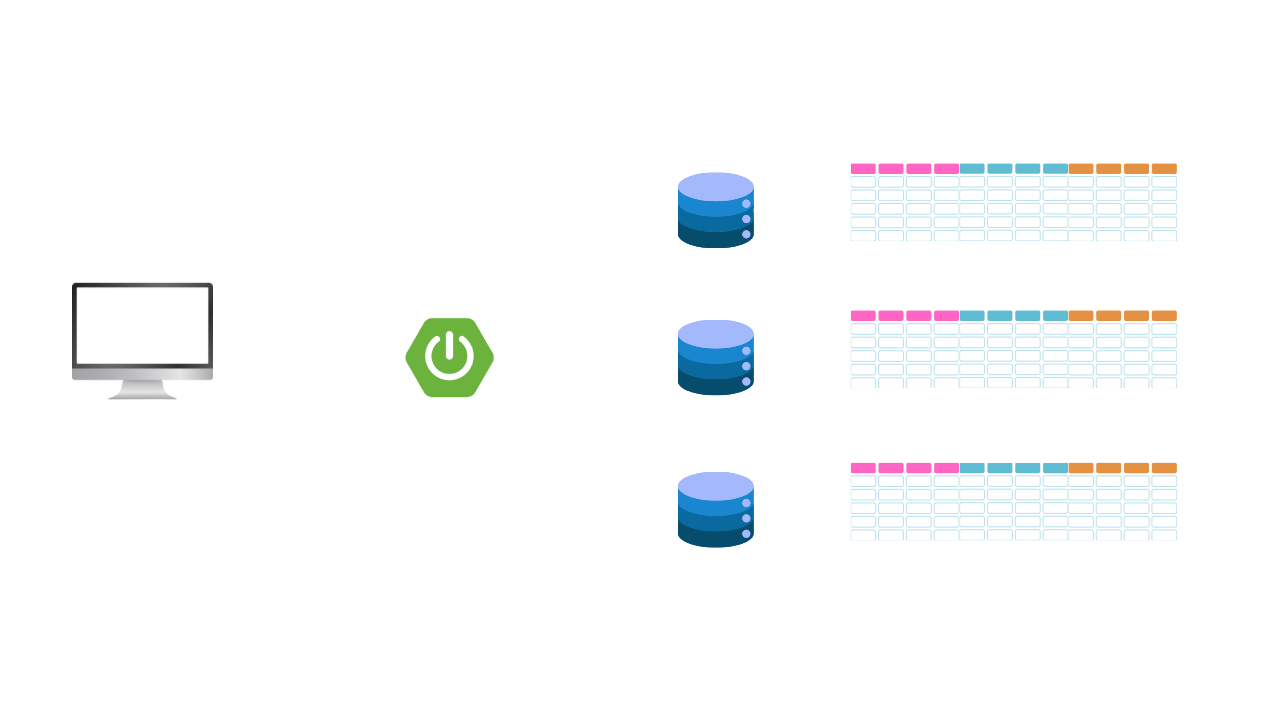
Separate Database per Tenant
In this approach, each tenant has their own physical database. For this reason, it is also called Database-level isolation.

Pros
Strongest isolation
Performance tuning per tenant
Easier legal/regulatory compliance (e.g., GDPR)
Cons
High resource usage
More complicated to manage connections and migrations
When to Choose This Approach
Choose this approach when:
You have high-value tenants that require strong data isolation and performance.
You need to meet strict compliance requirements such as GDPR.
Tenants have large data sizes or traffic, and you want to optimize performance individually.
When to Avoid This Approach
Avoid this approach when:
You expect to serve a low number of tenants.
You want to reduce the cost of infrastructure.
You don’t need strict data isolation.
Serving a low number of tenants with this model will increase the cost of infrastructure, such as hosting and database licenses.
Recap
| # | Single Database (Shared Tables) | Single Database (Separate Schema) | Separate Database |
|---|---|---|---|
| Isolation Level | Row-level isolation | Schema-level isolation | Database-level isolation |
| Description | All tenants share the same tables, separated by a tenant_id column. | Each tenant has their own schema within the same database. | Each tenant has a completely separate physical database. |
| Pros | ✅ Cost-effective ✅ Easy to maintain ✅ Easier to scale | ✅ Better data isolation ✅ Per-tenant backups/migrations | ✅ Strongest isolation ✅ Best per-tenant performance ✅ Easier compliance (e.g., GDPR) |
| Cons | ❌ Risk of data leaks if filtering fails ❌ Hard to tune performance per tenant | ❌ Schema management can get complex ❌ Not ideal for a huge number of tenants | ❌ Expensive ❌ Complicated to manage many databases and connections |
| When to Use | For apps with many small tenants sharing the same structure and light traffic | When you want isolation and some customization with a moderate tenant count | When you need strict isolation, legal compliance, or high-traffic tenants |
| When to Avoid | When strict isolation or custom features are needed | When tenants are too many to manage schemas easily | When you’re serving many small tenants or want to keep infrastructure costs low |
Multi-Tenancy in Spring Boot Using Hibernate
In this section, we’ll implement schema-level isolation for multi-tenancy using Spring Boot and Hibernate (ORM).
What We’ll Build
We’ll develop a simple invoices CRUD API that supports multiple tenants, with each tenant having their own schema. The flow will work as follows:
A client sends a GET
/api/v1/invoicesrequest to our Spring Boot application, including anX-Tenant-IDin the header.- Spring resolves the request by:
- Capturing the
X-Tenant-IDfrom the request header. - Switching the current database schema to the one associated with the given
Tenant ID. - Executing the required queries and processing the business logic within the correct tenant context.
- Capturing the
- The API responds with the appropriate data, scoped to the tenant’s schema.
This guide doesn’t cover how to implement CRUD APIs or follow their best practices. I assume you already have the knowledge to build a basic CRUD API. That way, we can focus purely on how to handle multi-tenancy in Spring Boot. 😊
Environment and Requirements
In this example, I’ll use the following:
- Java SE 17
- IDE (IntelliJ IDEA Community Edition 2023)
- Postman (or Curl)
- PostgreSQL v17
You can use any RDBMS you prefer. I chose PostgreSQL as it’s what I have on my machine. However, make sure you are using the same dependency versions as they are compatible with each other.
Implementation
Spring boot project structure
1
2
3
4
5
6
7
8
9
10
11
12
13
14
15
16
17
18
19
20
21
22
23
24
25
26
27
28
29
30
31
32
33
34
35
36
37
38
39
40
41
42
43
44
45
46
47
48
49
50
   core
    │   .gitattributes
    │   .gitignore
    │   HELP.md
    │   mvnw
    │   mvnw.cmd
    │   pom.xml
    │
    ├───src
    │   └───main
    │       ├───java
    │       │   └───com
    │       │       └───tenants
    │       │           └───core
    │       │               │   CoreApplication.java
    │       │               │
    │       │               ├───config
    │       │               │       HibernateMultiTenantConfig.java
    │       │               │       MultiTenantProvider.java
    │       │               │       SchemaResolver.java
    │       │               │       TenantFilter.java
    │       │               │
    │       │               ├───controller
    │       │               │       InvoiceController.java
    │       │               │
    │       │               ├───dto
    │       │               │       ResponseError.java
    │       │               │
    │       │               ├───entity
    │       │               │       Invoice.java
    │       │               │       Tenant.java
    │       │               │
    │       │               ├───exception
    │       │               │       BadRequest.java
    │       │               │       ExceptionAdvisor.java
    │       │               │
    │       │               ├───repository
    │       │               │       InvoiceRepository.java
    │       │               │       TenantRepository.java
    │       │               │
    │       │               └───service
    │       │                       InvoiceService.java
    │       │                       TenantService.java
    │       │
    │       └───resources
    │           │   application.properties
    │           │
    │           ├───static
    │           └───templates
  .....
Database structure
Here i have a simple Database with only 4 schemas:
Tenant Managemnt (tenant_management)
Holds the tenants’ data and each tenant’s schema name.
| id (UUID) | name (varchar) | schema_name (varchar) | created_at (timestamp) | updated_at (timestamp) |
|---|---|---|---|---|
| d8113b72-2623-4bd8-b178-437d3d9fca59 | Orange | orange_schema | 2025-04-26 04:18:52.915 | 2025-04-26 04:18:52.915 |
| 21d1cfec-877e-4ffc-adc2-900f8edf1fcf | WE | we_schema | 2025-04-26 04:18:52.915 | 2025-04-26 04:18:52.915 |
| 758460a7-8934-44e2-bbc1-f8d5856e16b4 | Vodafone | voda_schema | 2025-04-26 04:18:52.915 | 2025-04-26 04:18:52.915 |
Additionally, I have 3 tenant schemas as named in the schema_name column:
- voda_schema
- orange_schema
- we_schema
Each schema has one table called invoices (as I want to handle one module for this PoC).
The invoices table is very simple, with the following structure for voda_schema:
| id (UUID) | amount (numeric) | note (varchar) | created_at (timestamp) |
|---|---|---|---|
| 01fd313e-c537-4188-8ba5-161188bb3e68 | 110.00 | Voda-Invoice 1 | 2025-04-26 04:18:52.986 |
| 913687d9-9323-4829-bd83-6d0b60567ba1 | 160.00 | Voda-Invoice 2 | 2025-04-26 04:18:52.986 |
| 1ef2fcd1-d6e7-45f0-bedb-8950cfe921dc | 210.00 | Voda-Invoice 3 | 2025-04-26 04:18:52.986 |
Here is a SQL script to roll out my structure in your RDBMS if you want to test with the data I have:
1
2
3
4
5
6
7
8
9
10
11
12
13
14
15
16
17
18
19
20
21
22
23
24
25
26
27
28
29
30
31
32
33
34
35
36
37
38
39
40
41
42
43
44
45
46
47
48
49
50
51
52
53
54
55
56
57
58
59
60
61
62
63
64
65
66
67
68
69
70
71
72
73
74
75
76
77
78
79
80
81
82
-- Create the main schema for configuration
CREATE SCHEMA IF NOT EXISTS tenant_management;
-- Create example schemas for testing
CREATE SCHEMA IF NOT EXISTS orange_schema;
CREATE SCHEMA IF NOT EXISTS we_schema;
CREATE SCHEMA IF NOT EXISTS voda_schema;

-- Tenants table in tenant_management schema
CREATE TABLE tenant_management.tenants (
    id UUID PRIMARY KEY,
    name VARCHAR(255),
    schema_name VARCHAR(255),
    created_at TIMESTAMP,
    updated_at TIMESTAMP
);

-- Invoices table in tenant-specific schema
CREATE TABLE orange_schema.invoices (
    id UUID PRIMARY KEY DEFAULT gen_random_uuid(),
    amount NUMERIC(10, 2) NOT NULL,
    note VARCHAR(255),
    created_at TIMESTAMP NOT NULL DEFAULT CURRENT_TIMESTAMP
);

CREATE TABLE we_schema.invoices (
    id UUID PRIMARY KEY DEFAULT gen_random_uuid(),
    amount NUMERIC(10, 2) NOT NULL,
    note VARCHAR(255),
    created_at TIMESTAMP NOT NULL DEFAULT CURRENT_TIMESTAMP
);

CREATE TABLE voda_schema.invoices (
    id UUID PRIMARY KEY DEFAULT gen_random_uuid(),
    amount NUMERIC(10, 2) NOT NULL,
    note VARCHAR(255),
    created_at TIMESTAMP NOT NULL DEFAULT CURRENT_TIMESTAMP
);

-- Insert tenants into tenant_management.tenants
INSERT INTO tenant_management.tenants (id, name, schema_name, created_at, updated_at) VALUES
    (gen_random_uuid(), 'Orange', 'orange_schema', CURRENT_TIMESTAMP, CURRENT_TIMESTAMP),
    (gen_random_uuid(), 'WE', 'we_schema', CURRENT_TIMESTAMP, CURRENT_TIMESTAMP),
    (gen_random_uuid(), 'Vodafone', 'voda_schema', CURRENT_TIMESTAMP, CURRENT_TIMESTAMP);

-- Insert 10 invoices into orange_schema
INSERT INTO orange_schema.invoices (id, amount, note) VALUES
    (gen_random_uuid(), 100.00, 'Orange-Invoice 1'),
    (gen_random_uuid(), 150.00, 'Orange-Invoice 2'),
    (gen_random_uuid(), 200.00, 'Orange-Invoice 3'),
    (gen_random_uuid(), 250.00, 'Orange-Invoice 4'),
    (gen_random_uuid(), 300.00, 'Orange-Invoice 5'),
    (gen_random_uuid(), 120.00, 'Orange-Invoice 6'),
    (gen_random_uuid(), 130.00, 'Orange-Invoice 7'),
    (gen_random_uuid(), 170.00, 'Orange-Invoice 8'),
    (gen_random_uuid(), 180.00, 'Orange-Invoice 9'),
    (gen_random_uuid(), 190.00, 'Orange-Invoice 10');

-- Insert 10 invoices into we_schema
INSERT INTO we_schema.invoices (id, amount, note) VALUES
    (gen_random_uuid(), 105.00, 'We-Invoice 1'),
    (gen_random_uuid(), 155.00, 'We-Invoice 2'),
    (gen_random_uuid(), 205.00, 'We-Invoice 3'),
    (gen_random_uuid(), 255.00, 'We-Invoice 4'),
    (gen_random_uuid(), 305.00, 'We-Invoice 5'),
    (gen_random_uuid(), 125.00, 'We-Invoice 6'),
    (gen_random_uuid(), 135.00, 'We-Invoice 7'),
    (gen_random_uuid(), 175.00, 'We-Invoice 8'),
    (gen_random_uuid(), 185.00, 'We-Invoice 9'),
    (gen_random_uuid(), 195.00, 'We-Invoice 10');

-- Insert 10 invoices into voda_schema
INSERT INTO voda_schema.invoices (id, amount, note) VALUES
    (gen_random_uuid(), 110.00, 'Vodafone-Invoice 1'),
    (gen_random_uuid(), 160.00, 'Vodafone-Invoice 2'),
    (gen_random_uuid(), 210.00, 'Vodafone-Invoice 3'),
    (gen_random_uuid(), 260.00, 'Vodafone-Invoice 4'),
    (gen_random_uuid(), 310.00, 'Vodafone-Invoice 5'),
    (gen_random_uuid(), 130.00, 'Vodafone-Invoice 6'),
    (gen_random_uuid(), 140.00, 'Vodafone-Invoice 7'),
    (gen_random_uuid(), 180.00, 'Vodafone-Invoice 8'),
    (gen_random_uuid(), 190.00, 'Vodafone-Invoice 9'),
    (gen_random_uuid(), 200.00, 'Vodafone-Invoice 10');
I have added the note column and inserted the schema name into it to make it easier to identify where each invoice comes from.
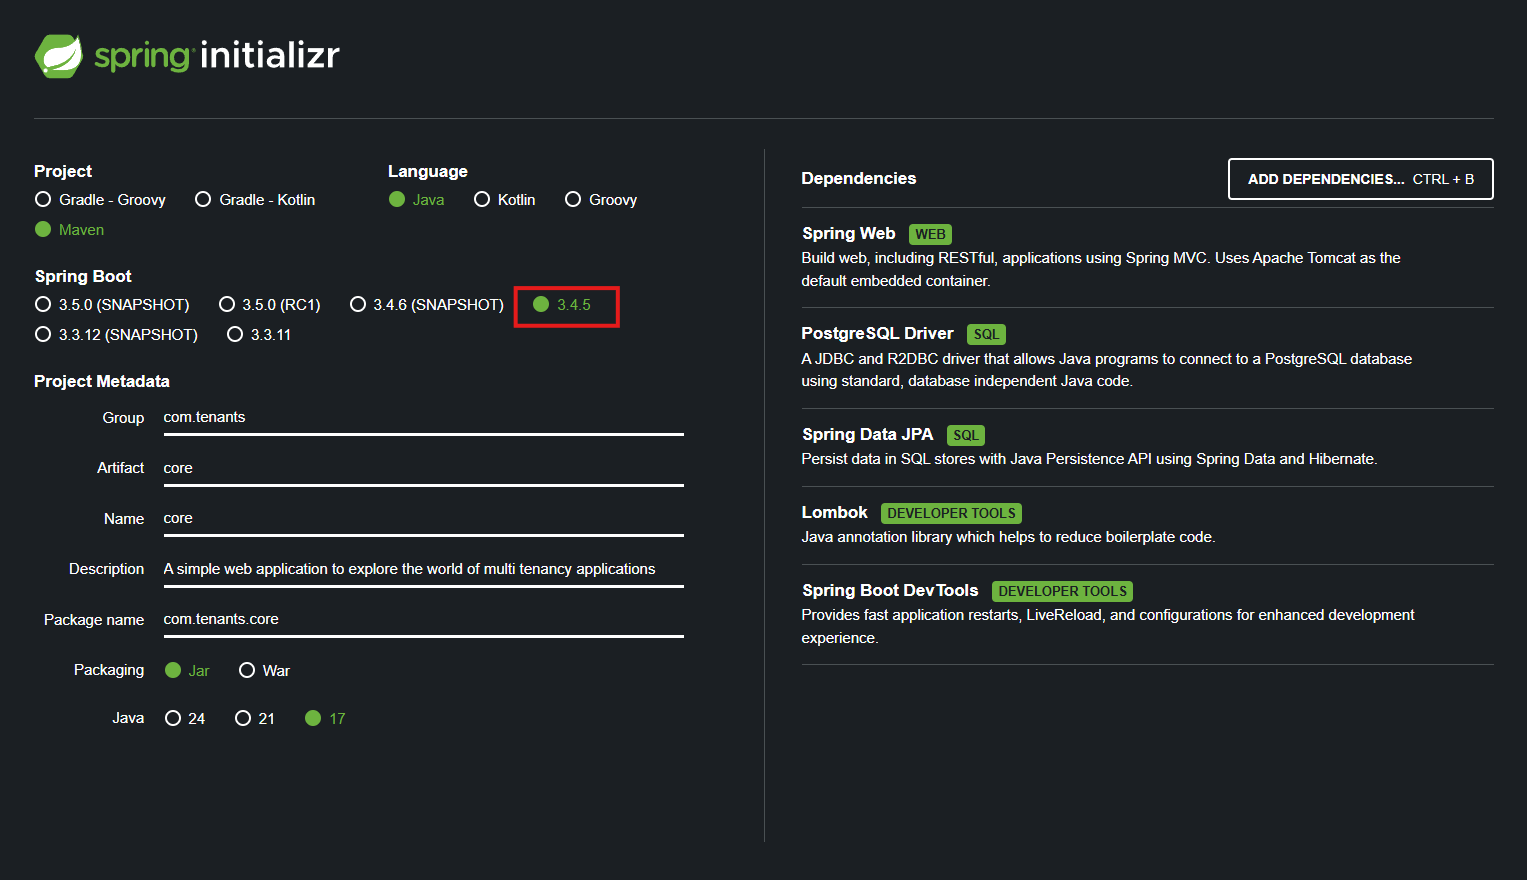
1. Create Spring Boot Project
- Use Spring Initializr to create a new Spring Boot project with the following required dependencies:
- Spring Web
- Spring Data JPA
- PostgreSQL Driver
Here is the pom.xml example
1
2
3
4
5
6
7
8
9
10
11
12
13
14
15
16
17
18
19
20
21
22
23
24
25
26
27
28
29
30
31
32
33
34
35
36
37
38
39
40
41
42
43
44
45
46
47
48
49
50
51
52
53
54
55
56
57
58
59
60
61
62
63
64
65
66
67
68
69
70
71
72
73
74
75
76
77
78
79
80
81
82
83
<?xml version="1.0" encoding="UTF-8"?>
<project
    xmlns="http://maven.apache.org/POM/4.0.0"
    xmlns:xsi="http://www.w3.org/2001/XMLSchema-instance"
	xsi:schemaLocation="http://maven.apache.org/POM/4.0.0 https://maven.apache.org/xsd/maven-4.0.0.xsd">
	<modelVersion>4.0.0</modelVersion>
	<parent>
		<groupId>org.springframework.boot</groupId>
		<artifactId>spring-boot-starter-parent</artifactId>
		<version>3.4.5</version>
		<relativePath/>
	</parent>
	<groupId>com.tenants</groupId>
	<artifactId>core</artifactId>
	<version>0.0.1-SNAPSHOT</version>
	<name>core</name>
	<description>A simple web application to explore the world of multi tenancy applications</description>

	<properties>
		<java.version>17</java.version>
	</properties>
	<dependencies>
		<dependency>
			<groupId>org.springframework.boot</groupId>
			<artifactId>spring-boot-starter-data-jpa</artifactId>
		</dependency>
		<dependency>
			<groupId>org.springframework.boot</groupId>
			<artifactId>spring-boot-starter-web</artifactId>
		</dependency>

		<dependency>
			<groupId>org.hibernate</groupId>
			<artifactId>hibernate-core</artifactId>
			<version>6.2.2.Final</version>
		</dependency>

		<dependency>
			<groupId>org.springframework.boot</groupId>
			<artifactId>spring-boot-devtools</artifactId>
			<scope>runtime</scope>
			<optional>true</optional>
		</dependency>
		<dependency>
			<groupId>org.postgresql</groupId>
			<artifactId>postgresql</artifactId>
			<scope>runtime</scope>
		</dependency>
		<dependency>
			<groupId>org.projectlombok</groupId>
			<artifactId>lombok</artifactId>
			<version>1.18.36</version>
			<scope>provided</scope>
		</dependency>
		<dependency>
			<groupId>org.springframework.boot</groupId>
			<artifactId>spring-boot-starter-test</artifactId>
			<scope>test</scope>
		</dependency>
	</dependencies>

	<build>
		<plugins>
			<plugin>
				<groupId>org.apache.maven.plugins</groupId>
				<artifactId>maven-compiler-plugin</artifactId>
				<version>3.10.1</version>
				<configuration>
					<source>${java.version}</source>
					<target>${java.version}</target>
					<annotationProcessorPaths>
						<path>
							<groupId>org.projectlombok</groupId>
							<artifactId>lombok</artifactId>
							<version>1.18.36</version>
						</path>
					</annotationProcessorPaths>
				</configuration>
			</plugin>
		</plugins>
	</build>

</project>
2. Configure Database Connection
1
2
3
4
5
6
7
8
9
10
# Hibernate configurations
spring.datasource.url=jdbc:postgresql://localhost:5432/MultiTenantDB
spring.datasource.username=<USERNAME>
spring.datasource.password=<PASSWORD>
spring.datasource.driver-class-name=org.postgresql.Driver
spring.jpa.properties.hibernate.dialect=org.hibernate.dialect.PostgreSQLDialect

# Hibernate multi-tenancy configuration
spring.jpa.properties.hibernate.multiTenancy=SCHEMA
hibernate.entity.package=com.tenants.core.entity
In the line spring.jpa.properties.hibernate.multiTenancy=SCHEMA, we instruct Hibernate to use schema-based multi-tenancy. Without this line, Hibernate would treat the application as a single-tenant system by default.
The property hibernate.entity.package is used when configuring the multi-tenancy provider. It tells Hibernate where to scan for entity classes so it can map them to database tables and manage their relationships.
3. Implement Multi-Tenancy Logic
3.1 Create Schema Resolver
Create a class to hold the current tenant ID for each request.
1
2
3
4
5
6
7
8
9
10
11
12
13
14
15
16
17
18
19
20
21
22
23
24
25
26
27
28
29
30
package com.tenants.core.config;

import org.hibernate.context.spi.CurrentTenantIdentifierResolver;
import org.springframework.stereotype.Component;

@Component
public class SchemaResolver implements CurrentTenantIdentifierResolver {

    private static final String DEFAULT_TENANT = "public";

    private static final ThreadLocal<String> currentTenant = new ThreadLocal<>();

    public static void setTenant(String tenantSchema) {
        currentTenant.set(tenantSchema);
    }

    public static void clear() {
        currentTenant.remove();
    }

    @Override
    public String resolveCurrentTenantIdentifier() {
        return currentTenant.get() != null ? currentTenant.get() : DEFAULT_TENANT;
    }

    @Override
    public boolean validateExistingCurrentSessions() {
        return true;
    }
}
In the SchemaResolver class, we implement the CurrentTenantIdentifierResolver interface, which is responsible for resolving the current tenant identifier. By implementing this interface, we must provide our own logic for two methods:
String resolveCurrentTenantIdentifier(): Returns the current schema name to switch to.boolean validateExistingCurrentSessions(): Returnstrueif the schema exists. By default, set it totrue.
This allows Hibernate to switch between schemas per request dynamically, based on the current tenant.
1
2
3
4
5
6
7
8
9
    private static final ThreadLocal<String> currentTenant = new ThreadLocal<>();

    public static void setTenant(String tenantSchema) {
        currentTenant.set(tenantSchema);
    }

    public static void clear() {
        currentTenant.remove();
    }
Additionally, we have added two helper methods to set and clear the current tenant. But why do we use ThreadLocal<String> instead of a simple String?
The reason is thread safety. A String is not thread-safe. As we process more requests simultaneously, threads may override the currentTenant value while another tenant is running its logic, which could lead to a big disaster 😅. Using ThreadLocal<String> allows us to have a separate copy of currentTenant per thread, ensuring isolation per request.
3.2 Implement Multi-Tenancy Connection Provider
Our goal here is to build a connection provider for our database, but not a normal one. We need to implement a schema-aware connection provider, and that’s where the MultiTenantConnectionProvider interface comes to the rescue.
MultiTenantConnectionProvideris a specialized connection provider contract used when the application is using multi-tenancy support requiring tenant-aware connections.
1
2
3
4
5
6
7
8
9
10
11
12
13
14
15
16
17
18
19
20
21
22
23
24
25
26
27
28
29
30
31
32
33
34
35
36
37
38
39
40
41
42
43
44
45
46
47
48
49
50
51
52
53
54
package com.tenants.core.config;

import org.hibernate.engine.jdbc.connections.spi.MultiTenantConnectionProvider;
import org.springframework.stereotype.Component;
import javax.sql.DataSource;
import java.sql.Connection;
import java.sql.SQLException;

@Component
public class MultiTenantProvider implements MultiTenantConnectionProvider {

    private final DataSource dataSource;

    public MultiTenantProvider(DataSource dataSource) {
        this.dataSource = dataSource;
    }

    @Override
    public Connection getAnyConnection() throws SQLException {
        return dataSource.getConnection();
    }

    @Override
    public void releaseAnyConnection(Connection connection) throws SQLException {
        connection.close();
    }

    @Override
    public void releaseConnection(String tenantIdentifier, Connection connection) throws SQLException {
        connection.close();
    }

    @Override
    public Connection getConnection(String tenantIdentifier) throws SQLException {
        Connection connection = dataSource.getConnection();
        connection.setSchema(tenantIdentifier);
        return connection;
    }

    @Override
    public boolean supportsAggressiveRelease() {
        return false;
    }

    @Override
    public boolean isUnwrappableAs(Class<?> unwrapType) {
        return false;
    }

    @Override
    public <T> T unwrap(Class<T> unwrapType) {
        return null;
    }
}
Every time Hibernate needs a connection to a specific schema, it asks the MultiTenantProvider class to provide it with the correct connection for that specific tenant. After finishing its work, the connection will be closed automatically by the MultiTenantProvider.
Our business logic lies in the getConnection(String tenantIdentifier) method, which is responsible for returning a connection based on the provided schema dynamically. The other methods are straightforward to understand, and you can refer to the documentation to learn more.
3.3 Configuring Hibernate
Here, we need to implement a configuration class, let’s name it HibernateMultiTenantConfig, as a central configuration where we tell Spring Boot and Hibernate about:
- The multi-tenancy approach we are using.
- Our custom connection provider
MultiTenantProviderand schema resolverSchemaResolver. - Where Hibernate should scan for entity classes.
Here is the implementation of the HibernateMultiTenantConfig class:
1
2
3
4
5
6
7
8
9
10
11
12
13
14
15
16
17
18
19
20
21
22
23
24
25
26
27
28
29
30
31
32
33
34
35
36
37
38
39
40
package com.tenants.core.config;

import lombok.RequiredArgsConstructor;
import org.hibernate.cfg.Environment;
import org.springframework.beans.factory.annotation.Value;
import org.springframework.boot.orm.jpa.EntityManagerFactoryBuilder;
import org.springframework.context.annotation.Bean;
import org.springframework.context.annotation.Configuration;
import org.springframework.orm.jpa.LocalContainerEntityManagerFactoryBean;
import javax.sql.DataSource;
import java.util.HashMap;
import java.util.Map;

@Configuration
@RequiredArgsConstructor
public class HibernateMultiTenantConfig {

    private final DataSource dataSource;

    private final MultiTenantProvider multiTenantProvider;

    private final SchemaResolver schemaResolver;

    @Value("${hibernate.entity.package}")
    private String entityPackage;

    @Bean
    public LocalContainerEntityManagerFactoryBean entityManagerFactory(EntityManagerFactoryBuilder builder) {
        Map<String, Object> properties = new HashMap<>();

        properties.put(Environment.MULTI_TENANT_CONNECTION_PROVIDER, multiTenantProvider);
        properties.put(Environment.MULTI_TENANT_IDENTIFIER_RESOLVER, schemaResolver);

        return builder
                .dataSource(dataSource)
                .packages(entityPackage)
                .properties(properties)
                .build();
    }
}
We are reading the entity package we set in application.properties earlier:
1
2
@Value("${hibernate.entity.package}")
private String entityPackage;
Here, we are setting our custom connection provider and schema resolver:
1
2
properties.put(Environment.MULTI_TENANT_CONNECTION_PROVIDER, multiTenantProvider);
properties.put(Environment.MULTI_TENANT_IDENTIFIER_RESOLVER, schemaResolver);
Entity configuration
Here is the implementation of the Tenant and Invoice entities:
1
2
3
4
5
6
7
8
9
10
11
12
13
14
15
16
17
18
19
20
21
22
23
24
25
26
27
package com.tenants.core.entity;

import jakarta.persistence.*;
import lombok.*;

import java.time.LocalDateTime;
import java.util.UUID;

@Data
@Entity
@Table(name = "tenants", schema = "tenant_management")
public class Tenant {

    @Id
    private UUID id;

    private String name;

    @Column(name = "schema_name")
    private String schemaName;

    @Column(name = "created_at")
    private LocalDateTime createdAt;

    @Column(name = "updated_at")
    private LocalDateTime updatedAt;
}
For the Tenant entity, we specify the schema because the tenants table, which holds tenant data such as schema names, resides in the tenant_management schema as mentioned earlier. Other entities don’t need to specify the schema because Hibernate will dynamically switch it for us.
Here is the Invoice entity:
1
2
3
4
5
6
7
8
9
10
11
12
13
14
15
16
17
18
19
20
21
22
23
24
25
26
27
28
29
30
package com.tenants.core.entity;

import jakarta.persistence.*;
import lombok.Getter;
import lombok.NoArgsConstructor;
import lombok.Setter;
import org.hibernate.annotations.CreationTimestamp;

import java.math.BigDecimal;
import java.time.LocalDateTime;
import java.util.UUID;

@Data
@Entity
@Table(name = "invoices")
public class Invoice {

    @Id
    @GeneratedValue
    private UUID id;

    @Column(nullable = false, precision = 10, scale = 2)
    private BigDecimal amount;

    private String note;

    @CreationTimestamp
    @Column(name = "created_at", nullable = false, updatable = false)
    private LocalDateTime createdAt;
}
Finally, our multi-tenancy logic is complete. But wait—how do we get the tenant ID for each request? 🤔
3.4 Create a Filter to Capture Tenant ID
In this final step of our journey, we need to implement a filter that captures the tenant ID from every request and sets the schema name in the SchemaResolver.
We will implement TenantFilter as a Servlet Filter. This filter will intercept incoming HTTP requests and handle multi-tenancy by ensuring that each request is routed to the correct tenant schema.
Here is the implementation of the TenantFilter class:
1
2
3
4
5
6
7
8
9
10
11
12
13
14
15
16
17
18
19
20
21
22
23
24
25
26
27
28
29
30
31
32
33
34
35
36
37
38
39
40
41
42
43
44
45
46
47
48
49
50
51
52
53
54
55
56
57
58
59
60
61
62
63
64
65
66
67
package com.tenants.core.config;

import com.tenants.core.entity.Tenant;
import com.tenants.core.service.TenantService;
import jakarta.servlet.http.HttpServletResponse;
import lombok.RequiredArgsConstructor;
import lombok.extern.slf4j.Slf4j;
import org.springframework.stereotype.Component;
import jakarta.servlet.*;
import jakarta.servlet.http.HttpServletRequest;
import java.io.IOException;
import java.util.Optional;
import java.util.UUID;

@Slf4j
@Component
@RequiredArgsConstructor
public class TenantFilter implements Filter {

    private final TenantService tenantService;

    @Override
    public void doFilter(ServletRequest request, ServletResponse response, FilterChain chain)
            throws IOException, ServletException {
        HttpServletRequest httpRequest = (HttpServletRequest) request;

        try {
            // Validate that X-Tenant-ID is present in the request header
            String tenantId = httpRequest.getHeader("X-Tenant-ID");
            log.info("Tenant ID={}", tenantId);
            if (tenantId == null || tenantId.isBlank()) {
                log.warn("Invalid or missing tenant ID, request tenant ID = [{}]", tenantId);
                ((HttpServletResponse) response).sendError(HttpServletResponse.SC_BAD_REQUEST, "Invalid or missing tenant ID");
                return;
            }

            // Validate if the tenant exists
            log.debug("Fetching tenant with ID={}", tenantId);
            Optional<Tenant> tenantObj = tenantService.findById(UUID.fromString(tenantId));

            if (tenantObj.isPresent()) {
                Tenant tenant = tenantObj.get();
                log.info("Tenant found: {}", tenant);
                String schemaName = tenant.getSchemaName();

                // Set schema to tenant's schema
                SchemaResolver.setTenant(schemaName);
                log.info("Current schema set to [{}]", schemaName);
            } else {
                log.warn("Tenant not found for ID={}", tenantId);
                ((HttpServletResponse) response).sendError(HttpServletResponse.SC_NOT_FOUND, "Tenant not found");
                return;
            }

            try {
                chain.doFilter(request, response);
            } finally {
                SchemaResolver.clear();
            }
        } catch (Exception ex) {
            HttpServletResponse httpResponse = (HttpServletResponse) response;
            httpResponse.setStatus(HttpServletResponse.SC_BAD_REQUEST);
            httpResponse.setContentType("application/json");
            httpResponse.getWriter().write("{\"message\": \"" + ex.getMessage() + "\", \"reason\": \"" + ex + "\"}");
        }
    }
}
This filter ensures that each request is processed in the context of the correct tenant schema. It validates the presence of the X-Tenant-ID header, checks if the tenant exists, and sets the schema accordingly. If any issues occur, appropriate error responses are returned to the client.
3.5 Testing with Voda Tenant
1
curl --location 'http://localhost:8080/api/v1/invoices' --header 'X-Tenant-ID: 758460a7-8934-44e2-bbc1-f8d5856e16b4'
Logs
2025-04-26T15:44:30.576+03:00  INFO 28528 --- [core] [nio-8080-exec-1] o.a.c.c.C.[Tomcat].[localhost].[/]       : Initializing Spring DispatcherServlet 'dispatcherServlet'
2025-04-26T15:44:30.576+03:00  INFO 28528 --- [core] [nio-8080-exec-1] o.s.web.servlet.DispatcherServlet        : Initializing Servlet 'dispatcherServlet'
2025-04-26T15:44:30.577+03:00  INFO 28528 --- [core] [nio-8080-exec-1] o.s.web.servlet.DispatcherServlet        : Completed initialization in 1 ms
2025-04-26T15:44:30.585+03:00  INFO 28528 --- [core] [nio-8080-exec-1] com.tenants.core.config.TenantFilter     : Tenant ID=758460a7-8934-44e2-bbc1-f8d5856e16b4
2025-04-26T15:44:30.656+03:00  INFO 28528 --- [core] [nio-8080-exec-1] com.tenants.core.config.TenantFilter     : Tenant found: Tenant{id=758460a7-8934-44e2-bbc1-f8d5856e16b4, name='Vodafone', schemaName='voda_schema', createdAt=2025-04-26T04:18:52.915407, updatedAt=2025-04-26T04:18:52.915407}
2025-04-26T15:44:30.656+03:00  INFO 28528 --- [core] [nio-8080-exec-1] com.tenants.core.config.TenantFilter     : Current schema set to [voda_schema]
Result
1
2
3
4
5
6
7
8
9
10
11
12
13
14
15
16
17
18
19
20
21
[
    {
        "id": "01fd313e-c537-4188-8ba5-161188bb3e68",
        "amount": 110.00,
        "note": "Voda-Invoice 1",
        "createdAt": "2025-04-26T04:18:52.986748"
    },
    {
        "id": "913687d9-9323-4829-bd83-6d0b60567ba1",
        "amount": 160.00,
        "note": "Voda-Invoice 2",
        "createdAt": "2025-04-26T04:18:52.986748"
    },
    ...
    {
        "id": "fb459530-6e9e-468f-8dd9-021a9e9a9c72",
        "amount": 200.00,
        "note": "Voda-Invoice 10",
        "createdAt": "2025-04-26T04:18:52.986748"
    }
]
3.6 Testing with Orange Tenant
1
curl --location 'http://localhost:8080/api/v1/invoices' --header 'X-Tenant-ID: d8113b72-2623-4bd8-b178-437d3d9fca59'
Logs
2025-04-26T15:46:12.449+03:00  INFO 28528 --- [core] [nio-8080-exec-4] com.tenants.core.config.TenantFilter     : Tenant ID=d8113b72-2623-4bd8-b178-437d3d9fca59
2025-04-26T15:46:12.453+03:00  INFO 28528 --- [core] [nio-8080-exec-4] com.tenants.core.config.TenantFilter     : Tenant found: Tenant{id=d8113b72-2623-4bd8-b178-437d3d9fca59, name='Orange', schemaName='orange_schema', createdAt=2025-04-26T04:18:52.915407, updatedAt=2025-04-26T04:18:52.915407}
2025-04-26T15:46:12.453+03:00  INFO 28528 --- [core] [nio-8080-exec-4] com.tenants.core.config.TenantFilter     : Current schema set to [orange_schema]
Result
1
2
3
4
5
6
7
8
9
10
11
12
13
14
15
16
17
18
19
20
21
[
    {
        "id": "8f19a779-1da7-444c-9387-7bcecac52494",
        "amount": 100.00,
        "note": "Orange-Invoice 1",
        "createdAt": "2025-04-26T04:18:52.972146"
    },
    {
        "id": "10874a95-53d0-4c2e-9f75-640e24f09548",
        "amount": 150.00,
        "note": "Orange-Invoice 2",
        "createdAt": "2025-04-26T04:18:52.972146"
    },
    ...
    {
        "id": "32235794-e63a-4645-9258-a87a1116cb31",
        "amount": 190.00,
        "note": "Orange-Invoice 10",
        "createdAt": "2025-04-26T04:18:52.972146"
    }
]
And bingo! You have a simple multi-tenant, schema-level isolation Spring Boot application with Hibernate. Now you can add modules as you wish. For example, if this is a clone of the Zoho Books application, you can add customers, vendors, accountants, projects, etc. The logic will apply to all of these modules.
Note
This implementation IS NOT production-ready; it’s just a very simple PoC to demonstrate the multi-tenancy architecture in Spring Boot. Maybe I’ll write a post about implementing a scalable multi-tenant application with enhanced performance in the future. Let me know if you are interested in it 😊.
Concolusion
Multi-tenancy is a powerful architectural pattern, but it’s not a one-size-fits-all solution. The right approach depends on your application’s requirements, scale, and the level of data isolation needed. By understanding the trade-offs of each model, you can make an informed decision that aligns with your goals
I hope this article helped clarify the options and gave you a solid foundation to choose the best fit for your case.
I’m always open to feedback, ideas, and discussions — feel free to share your thoughts in the comment section below! 👇